The Rose and The Butterfly

Last weekend, I had the pleasure and good fortune of attending a sugarpaste modelling class at a local cake company here in Luxembourg. Sweet Lily, situated right on Avenue X Septembre, regularly hosts cake decorating classes, both for children and adults.

2015-12-05 19.27.15

This time, Emi, from Cake Atelier, led a sugarpasteĀ modelling class and taught us how to create a beautiful and realistic looking rose, and a butterfly. We learned how to use a variety of tools to obtain the desired effect, how to use floral wire to hold the whole thing together, and how to paint each individual flower with powdered food colouring.

2015-12-05 19.26.36

We also learned how to effectively level, ice, and cover a cake with fondant. Personally, I discovered that Satin Ice fondant is easier to work with and less likely to tear, than Renshaw, which I’ve always used so far (which isn’t to say that Renshaw is of poorer quality; just a different feel to it).

I’m very excited to start applying these methods to my future cakes!

Sneak peek: Holiday season

I’m pretty sure this is the first time I’ve ever made holiday season cookies so early (we’re not even out of November yet?!)

2015-11-20 13.24.49

Stay tuned, as I have lots of baking to come in the next month or so, and I’m excited to share it all with you!

Jo x

Happy Graduirthday!

Hi! Hi there! Do you remember me? I know it’s been a while since I’ve posted anything new. Life caught up and got in the way, and basically summer was far too interesting to get back to blogging. And then school started again and that kept me busy. Oh and I got engaged! So between extreme excitement, wedding planning, and general life (I also moved apartments and helped my dear friends move too), blogging, and baking, got pushed to the side.

IMG_3490

You know how sometimes you fall out of a certain habit and it’s really hard to get back on the wagon? Blogging has kind of been like that. I got really down at low views, and felt like it was just my family and close friends looking at this. Now that I (accidentally) took a little over a year’s break from it – completely, I didn’t even log on to WordPress! – I feel like I can look at it with fresh eyes. And guess what! Somehow in between all of that, views have picked up!

Definitely an ego-booster.

IMG_3492

This was a sweet cake for a double celebration – achieving a Masters degree and turning 25. And little did the party in attendance know, she was also nurturing life. But it was far too early to have included that in the cake. So we kept to the other big news.

Looking ahead-

I’m hoping to catch up on posts from the last year or so, and start blogging about my baking adventures more regularly. I may even invest in a proper camera and backdrop!

Until then- enjoy the new postings.

Drum Roll Please!

This fabulous cake was for a friend and colleague of mine who has taught at my school for about as long as I can remember. He taught 3rd grade when I was in 3rd grade (although I wasn’t in his class), and was a dear friend of my mother’s. This year, he retired, and I was overjoyed that his wife asked me to make a cake for his retirement party.

His main interests (apart from teaching) being playing the drums (he’s a musician as well), art, and swimming, we decided to creatively represent all three of these.

I baked a combination of vanilla and chocolate cakes, and to add a bit of excitement, placed a chocolate layer in the vanilla cake. This was the bottom tier, and largest drum.

IMG_3401

The second, smaller drum, was entirely chocolate, and the ‘skin’ cover of the drum was blue, to represent a swimming pool.

IMG_3402

Making the metal fixings of the drums was tricky, but proved to be quite an important learning step for me. This was the first time I’d done anything like it, and getting to fondant around in one piece was difficult. I had to do it in two pieces for the largest drum, as using one one length kept tearing.

IMG_3405

Once I got it stuck on and let it set for a few minutes, I painted over the grey fondant with metallic silver food paint.

IMG_3413

I had one thin layer of chocolate cake leftover, and rather than throwing it away (I hate wasting, and I was out of space in my freezer to freeze it), I made a thin tambourine to sit on top. This was a total extra, but I thought it’d be nice to emphasize Robert’s passion for art by also including an artists’ palette; instead of just having drumstick paintbrushes.

IMG_3414

This part was a bit last-minute, and not as secure as I would have liked it to be, however the overall effect was striking.

IMG_3415

Everything (except dowel rods) is edible in the cake, including the drumstick paintbrushes which are made of fondant.

Happy Retirement!

You’re Never Too Old For An Animal Party

This epic cake was for a young lady who turned 18. Her party’s theme was ‘animals’ and she herself was going as a unicorn, which I applaud because you should never ever lose your silly side just because you grow up.

So I searched for animal cakes, and found one that served as my basic inspiration. Given more prep time, I would have ordered more specific fondant and created better decorations and figurines, but given the resources that I had, I think it turned out OK.

I decided on a three tiered cake. If you are a baker and ever find yourself having to bake a cake for a large number of people (50 in this case) and no idea how much cake you actually need, I highly recommend signing up to this website: www.bakingit.com. It’s free, so long as you’re using it on a computer, and it will basically design your cake for you, once you put in your specifications (shape, number of portions, etc).

The largest tier was a marbled vanilla-chocolate cake, with fresh strawberry icing. This icing is DIVINE.

IMG_3294

I covered it in white fondant, and decorated with strips of black to emulate a zebra’s hide.

IMG_3298

The middle tier was a chocolate mudcake, or as my father calls it, brownie cake. Given its’ richness, I decided to simply cover it with dark chocolate ganache, as a tree trunk.

IMG_3299

I punched out lots of leaves both in dark green and bright green fondant, and lined the top of the middle tier. I used three different sizes, first the big ones, then I used middle sized to fill in the gaps.

Once I placed the final tier on top, I used the tiny sized leaves to hide the edge. The final tier was all vanilla, and decorated to look like a giraffe’s skin.

IMG_3300

And lastly, I did make a small elephant and panther head, because after all, it wouldn’t be much of an animal cake if only two animals were represented. I found this handy tutorial to teach me how to make an elephant; the panther came straight from my imagination ^_^

IMG_3301

I had a blast making this cake, even if it did stress me out, I had bad luck finding the right gluten-free flour, and I was up at all hours of the night putting it together. But the look on Lucie’s face when I delivered the cake was definitely worth it.

Happy Birthday!

First Communion: FC Porto

This is the second First Communion cake I made, coincidentally for the same weekend as the football pitch. The request here, was to create a cake using the FC Porto logo as inspiration, as that is the boy’s favourite football team. Of course, the logo had to be rather complex:

FCPorto

Since the cake was for around 20 people, I decided to use the round blue part as the main cake base, and supplement it with a half football in order for there to be enough cake for everyone. For the crest, I ordered some wafer card and used edible ink markers to draw it.

IMG_3257

The cake itself was vanilla, with vanilla icing. I used blue icing between the layers to keep in with the FC Porto theme.

IMG_3256

IMG_3259

Then, I baked a half sphere cake in my handy Wilton’s Sports Ball pan (such a lifesaver for these things!) and fixed it towards the back of the cake with some icing. I also cut it in half to add some icing in it – makes it look prettier, and I feel that the icing helps break up the cake texture a bit.

IMG_3260

The next morning, I got to tessellate again, which I was very excited about. This time, I actually ordered a cookie cutter set specifically made to cut fondant to cover a football cake. They worked a treat!

IMG_3261

The crowning piece was affixing the wafer card to the front of the football. I used some extra icing to attach it at the back, as I was worried that using edible glue would affect the wafer and the ink.

IMG_3263

Ta-da!

Congratulations Patrick!

First Communion: Soccer Pitch

Today, I’ve decided I’m going to catch up on the last three major cakes I’ve done: two First Communion cakes and an 18th Birthday cake.

This communion cake was for my colleague’s son, who loves (as many 8 year olds do) football. He initially told his mother he wanted a Cristiano Ronaldo cake, and although I’m a fairly good cake baker/decorator, I don’t think I’m quite at that level yet! So, we settled for a football pitch, to which she would add a couple of football figurines.

IMG_3250

So, I baked a Devil’s Food chocolate cake (the irony of the name and the occasion it was for did not escape me), and used grass green vanilla buttercream between the layers. I then covered the whole thing in a flat layer of buttercream before using my grass tip to pipe grass onto the field. I added the white field markings, and finished with a congratulatory message – in Spanish, no less!

IMG_3254

This was a fairly simple cake to make, overall, although it was time consuming to pipe all the grass. It also helped that I had previously made a similar cake back in the fall (Soccer cake for 20), so I knew exactly what I needed to make this one.

Congratulations Sean!

A Spring Twist: White Chocolate & Raspberry Cake

Upon our return from Spring break, we celebrated our final two birthdays of the year. Seeing as I’d made several chocolate cakes before, I gave a twist to this one, and made it with white chocolate instead, and iced it with fresh raspberry buttercream.

I searched online, as usual, for recipes that would suit my ideas. I used this recipe for the white chocolate cake. It works quite well, although I would urge you to absolutely follow directions and lay down a piece of parchment paper at the bottom of the pan. The cake is quite sticky to get out, and I lost one layer in the process. This meant I had to bake another batch of the recipe, which resulted in the cake having three layers instead of two (which worked out very positively in the end šŸ™‚ ).

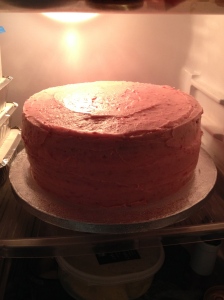
Once baked and cooled, I disregarded their white chocolate frosting, and instead used a delicious, fresh raspberry buttercream recipe instead. When you first add the raspberries to the butter, don’t get discouraged that the mixture looks very sloshy! The icing sugar absorbs it all, and the quantities listed are perfect.

Here is the cake, firming up in the fridge with the buttercream:

IMG_3084

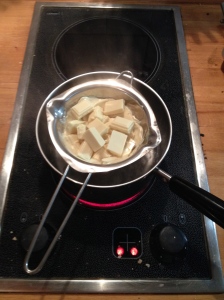
While the cake was setting, I melted a whole bunch of chocolate over a double boiler. I think I melted about 160g. This was to make the beautiful lace collar I planned to place around the cake. For a great tutorial (with pictures!) on how to make one, click here. I love the little pan I used with the pourer bits on each side. I knew I would have to pour the melted chocolate into a piping bag, so that made it much easier and mess-free.

IMG_3083

I cut a piece of wax paper in half, and stuck the two ends together to get a long collar. I laid it out on the counter, and once the chocolate was cool enough in the piping bag so I wouldn’t burn my hands, I piped random swirls on the wax paper.

IMG_3085

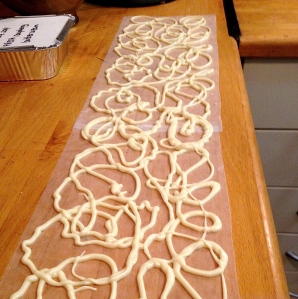
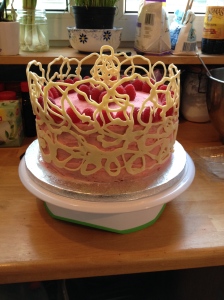
In hindsight, I would cut a slightly smaller hole in the piping bag, as some of these lines are really thick, and it took twice as long for them to set than what the tutorial said (1 hour, instead of 1/2 an hour). But I finally was able to carefully press the collar around the cake.

IMG_3086

Obviously, it was a bit taller than I estimated. I put the cake in the fridge, and left it overnight to set completely.

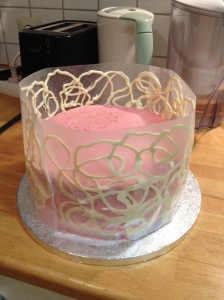
The next morning, I very very carefully peeled away the wax paper, and added fresh raspberries to spice up the top decoration.

IMG_3088Ā Ā Ā Ā  IMG_3089

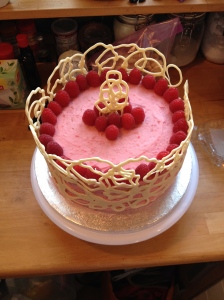
Upon taking the wax paper away, I could see that, ideally, I should have placed the chocolate a little lower, so that it would be aligned with the bottom of the cake. But for a first attempt, I was very satisfied with how it turned out.

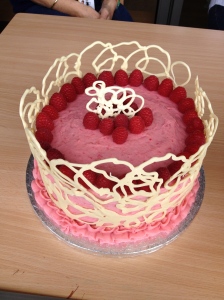
I didn’t have time that morning before leaving, so I put the leftover buttercream and my piping tools in the bag, and piped an edge around the bottom to hide the gap. My original chocolate centerpiece also cracked, but luckily, I had made several and had a back-up, for when it was time to serve the cake.

IMG_3094

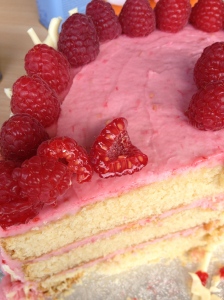
And the inside looked just as delicious 0.O

IMG_3097

Thank you for reading! ^_^

Jo x


Decadent Chocolate Roses

Today’s cake is a rather decadent chocolate layer cake. Months ago, my friend Emily sent me a picture of a cake with large chocolate rose swirls all over it, and I resolved to make it for her birthday. Well, her birthday eventually came around (as birthdays do), and she got her chocolate cake.

The cake itself is a simple cocoa devil’s food cake. which I iced with chocolate buttercream, both between the layers and on the outside. Then I made another batch of buttercream for the large roses.

IMG_2825

To help break up the monotony of constant brown chocolatey-ness, I whipped up a mini batch of vanilla buttercream and colored it pink. I added tiny swirls of pink ‘flowers’ to complement the brown.

IMG_2831

And of course, I got to practice my piping writing. Although I did forget to cross the ‘t’ in birthday! O.O

Sorry this was a bit of a short post this time around – I didn’t take many pictures of this cake, and it was a fairly simple confection.

Thanks for reading,

Jo x


Birthday Boardgame Bonanza

Hello everyone!

Apologies for my absence. Things got very very busy and it was hard to find time to sit down and write a proper post. Of course, that means there is a lot to catch up on! So without further ado…

I made three cakes for Zak’s Boardgames Birthday Bonanza. The lesson I learned? How to appropriately size cakes for a given number of people. There was WAY TOO MUCH cake (wait, is that even possible?).

Given his recent foray into Minecraft, the first cake I decided to make him was a cake that looks the way cake does in Minecraft.

IMG_2670

This was a chocolate cake with chocolate buttercream icing. I genuinely looked up a picture of a Minecraft cake in Google so I could place the red sprinkles accurately. This was a relatively simple cake, although cutting and placing the white fondant was tricky. It was fun, although some people at the party were confused about it.

I also made Minecraft cake pops: chocolate of course, and made to look like blocks of dirt or with mine-able materials.

IMG_2657

The second cake I made, was of Zak’s favorite boardgame of all time: Pictionary.

IMG_2669

This one was purely vanilla: cake and buttercream icing. Again, a simple design, covered in fondant. I got to use my brand-new writing tips to pipe the white outlines and words. While you can’t tell in this picture, my writing is still a bit wobbly. To help make the lines straight, I used a piping lace decorating tip from SweetSugarBelle “Piping Lace on Cookies” (A side note: I’m really excited to try piping lace too!).

Also, the reason the colors are a bit off on the board, it’s because it’s hard to cut a rectangular board into five equal areas, and I had very little orange/purple-blue fondant to work with. Covering the cake boards was a rather last-minute idea.

The final cake I made, was based on the Settlers of Catan. I ordered a hexagon-shaped cake pan and had to make four times my regular vanilla cake recipe. I put chocolate buttercream between the layers. I covered the whole thing in fondant, hexagons the exact size of the game pieces. I made my own Robber. I even made dice! I’m pretty darned proud of this cake.

IMG_2671Ā  IMG_2672

To help with the placing of the resources, I generated a game on my iPad version, for complete authenticity. Although the cake isn’t big enough to show the full game, the resources are placed randomly, as are the numbers.

So, three cakes, when really, the Catan cake would have fed us all.

IMG_2675

So the birthday boy was very happy, and I was pleased to pull this off, even if I do need to seriously reconsider cake quantities etc.

IMG_2678

Thanks for reading!

Jo

PS. I know this post isn’t as detailed as to the making-of for each cake, but I thought it would simply be too long, and I didn’t like the idea of splitting it into three posts. Suffice to say there was a lot of work involved but I’m pleased with how they all turned out ^_^